
.jpg)
Having
recently emigrated from England I have settled with my wife here in New
Orleans. My background is in the commercial design sector, specializing
in packaging development and brand stewardship for the fast moving
consumer goods industry. I had reached a point where I had become jaded
with my work, not only in the industry itself but with the professional
world in general.
I have long harboured a desire to pick up a trade and begin to construct spaces and objects with my own hands, and to be able to design and build spaces in homes and elsewhere. I wanted to do something more substantial and rewarding than producing supermarket packaging that is essentially constrained by appeals to commercial pressures to then only remain in the public domain for a few months before finally disappearing into the ether.
I have long harboured a desire to pick up a trade and begin to construct spaces and objects with my own hands, and to be able to design and build spaces in homes and elsewhere. I wanted to do something more substantial and rewarding than producing supermarket packaging that is essentially constrained by appeals to commercial pressures to then only remain in the public domain for a few months before finally disappearing into the ether.
I found Gautschi Holz Works purely by chance when researching my options through the internet, via an article NOLA.com had written on the Swiss owner Heinz Gautschi.
His story on how he came to live in the US and further develop his art
resonated with me and upon contacting him it soon became apparent he was
a consummate master-craftsman and an engaging person to learn from.
As fortune would have it, he was looking to begin an apprenticeship program and I was fortunate enough to be offered a placement. I guess when I think of myself in ten
years time I see a person comfortably raising his family through a
highly skilled trade, exercising an artistic flair whilst also keeping a
strong grasp on the historical heritage of period buildings and their
concomitant features. And this person will be living in a house either
he has built or lovingly restored to its former glory. This is what I
hope to gain from this apprenticeship and I'm excited to be a part of
it.
Hand-Carved Oak Leaf Bowl - 4th February 2013
The first project is to use an off-cut of mahogany, take the
dimensions and then create a design for a hand-carved bowl. The guiding
principles of this project will be to apply creative intelligence to what can
be achieved with the given material and to research and draw a design for a
challenging and aesthetically pleasing piece. The key skills will be honed
through the exclusive use of hand tools which include:
- Bow-saw with a Japanese blade
- Set of Swiss made carving chisels and carving mallet
- 220 and 320 grade sandpaper and sanding block
- Clamps
- Vice
- Ammonia
- Osmo top oil
- Gas mask and container

First I drew the outline of the bowl. I then set about hand
sawing the outline with the wood in a vice. Although it’s not too important on this piece it is expected that I cut at a
direct right angle to the flat surface of the wood and this project represents
a good opportunity to develop this discipline. The hand saw takes some getting
used to in negotiating the acute angles of the leaf shape.


Next is to draw an inner outline within the ellipse, clamp
the wood down and begin chiseling out the concave section of the bowl.
Particular attention to the correct method of controlling the chisel is a
frequent lesson I’m encouraged to observe as sloppy habits are quick to develop
and take time to eradicate. I’m also expected to pay very close attention to
the direction of the grain within the wood and learn the technique of being
able to read how the wood will react to the chisel. It’s really not as easy as
simply looking for the direction of the grain and it can take a long time to
become skilled knowing the angle at which to cut into the wood.


In addition to
the stem/handle of the leaf, four primary points are left uncut to serve as
support when working on the underside of the bowl and for bracing with the
clamps. The height of the workbench has been too low causing me to stoop over
the bowl. This is a critical issue that we’ve compensated for in week three of
the apprenticeship by acquiring a raised table that allows me to work at elbow
height.

Next is to outline the leaf shape within the hollow and hand
saw the outline of the leaf. This is even trickier than before and requires
particular attention to stress exerted on the blade so as not to snap the metal
in two.


Next we draw the raised veins of the leaf and chisel the
exaggerated outline leaving a healthy amount of room for error. The key at this
point is to reduce the errors and begin a greater finesse as mistakes are going
to become harder to compensate for. Next we chisel away the recesses and
carefully narrow the veins further.


Once the surfaces have been acutely chiseled to the
necessary smoothness to satisfy Heinz, I’m rewarded with my first use of the 220
grade sandpaper. Some of the veins now appear to be cresting like a wave to one
side and I’m required to return to the chisel and make further refinements. The
sanding process further shows imperfections in my chisel work which once more
requires further finishing before sanding to a fine finish.


An oval template is made for the base and with a few further
outcrops the underside of the bowl can now be chiseled away. This requires care
so as not to split away large sections of the ends of the leaf and once more
the grain of the wood needs close attention.


22nd February 2013
I’m now in a position to develop the handle and this requires a keen eye to achieve the circular finish to the stem. Constant chiseling and sanding give us the required finish.
I’m now in a position to develop the handle and this requires a keen eye to achieve the circular finish to the stem. Constant chiseling and sanding give us the required finish.

This is also the time to return to the underside of the bowl
to completely ensure that the surfaces are as smooth as possible with the
chisel. This is very time consuming however essential to ensure that when sanded and
oiled no imperfections become noticeable.
The bowl is returned to its base so that the four bracing points on the leaf tips can be worked out and finished to the leaf design leaving just the block at the end of the stem to clamp the bowl in place.
The bowl is returned to its base so that the four bracing points on the leaf tips can be worked out and finished to the leaf design leaving just the block at the end of the stem to clamp the bowl in place.

Next I sand the entire bowl with the 220 grade paper ensuring all chisel marks and uneven surfaces are worked out. Again this is time consuming and very important to ensure a clean post-oiled finish. Once this is completed I repeat the process with 320 grade paper and use a sanding block to finish the flat base.

Next I wet the bowl with water and a soft cloth and leave to dry. This
makes the fibers of the wood stick up and you can feel the bowl has become
course once more. I then repeat the process of
sanding with 320 grade paper, however this is now a much quicker
process than the first time.
Now I can saw away the bracing block from the handle and carefully finish the end of the leaf stem with the chisel and then sand off to a smooth finish.

Once the bowl is fully inspected for
imperfections and I'm satisfied with the final result we move to the ammonia
fumigation. This process is designed to draw out the deeper natural color of
the wood without recourse to staining products. I set up a large container with
a raised wooden frame to support the bowl over some dishes in which the ammonia
is poured. This is a particularly noxious substance and a gas mask is required
to prevent the harmful fumes getting into my respiratory system. I then set the
bowl down over the ammonia filled dishes and seal the container for three days.

After this period the bowl has taken on a much darker and richer hue. Next is
to apply the Osmo top oil to the bowl ensuring smooth and even application
across the surfaces. At this point it becomes evident that the bowl has taken
on a much darker and somewhat unnatural complexion than expected and the bowl
is left to sit.

Trials are conducted on off-cut samples of the mahogany, going through the process of the ammonia fumigation and applying different oils to the wood and it seems Osmo is reacting too heavily against the ammonia enriched surface of the wood. It is therefore determined that re-sanding the bowl is necessary, followed by a further fumigation and then the application of the Osmo once more.
5th April 2013
These are the images of the completed bowl. The work has been all my own however it has been achieved only by having the guiding influence of an experienced teacher. To have achieved this result would have taken many substandard attempts had I been working by myself. The completed bowl has surpassed my expectations and taught me the necessary level of attention to detail required for this level of quality.


Practicing joints by hand
Whilst experimenting with the finish for the bowl, I've been given the task of practicing cutting joints into different species of wood. This is once more by hand using saws and chisels. The species of wood include poplar, hickory/pecan, beech, yellow pine, soft maple, red oak, sinker and regular cypress, Each of the species has different characteristics of the grain and density and it is beneficial to begin learning the particular characteristics of each of them at this early stage.

The tools
required for this include bevel-edged chisels and mallet, set of various hand saws, try/set square, two types of marking
gauge, T bevel/bevel gauge, steel rule, pencil, clamps, bench hook and a dovetail marking gauge.

Prior to attempting these joints it's imperative to ensure your chisels are sharpened to the appropriate angle of incidence. To do this provided a great opportunity to learn the principles of the Tormek sharpening wheel. It is possible to sharpen chisels on direct drive stones with a greater rotation per minute, however for the purpose of fine wood chisels the wet stone method at the slower RPM is better as the greater the friction, the more the metal loses its strength and the chisel will dull faster upon use. This method also requires less time after sharpening to hone the beveled point on the leather wheel. As with many facets of woodwork, it is often paradoxically the longer process that ends up being the fastest method for the best possible result.
 After a couple of days practicing various joints into various species of wood, I began to attempt joining pieces of wood using lap joints.


Right angled lap joints are a good place to start however it really gets interesting when I attempt angled joints incorporating more complexity such as open tenon/lap joints and dove-tailed lap joints.
As another test of precision, I attempted a simple Chinese puzzle which works using variations on the lap joint principle. The cuts have to be uniform and exact otherwise the pieces won't fit together.


As another test of precision, I attempted a simple Chinese puzzle which works using variations on the lap joint principle. The cuts have to be uniform and exact otherwise the pieces won't fit together.


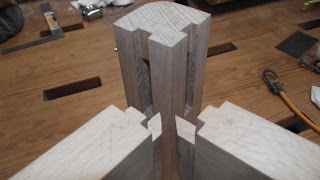
Next is the practice of mortise and tenons. In this first example it is also a requirement to cut into the side profile with a miter joint and apply a step back in the tenon as a window would be typically configured.


This frame has been configured using four different mortise and tenon designs. It is of particular importance to ensure a delicate hand so as not to split the wood when mortising the joints with the hand chisel.


15th May 2013
To develop the methods of cutting mortices and tenons into more technically difficult configurations, I set about creating a stool from European beech. We also wanted this to incorporate the use of the wood plane.

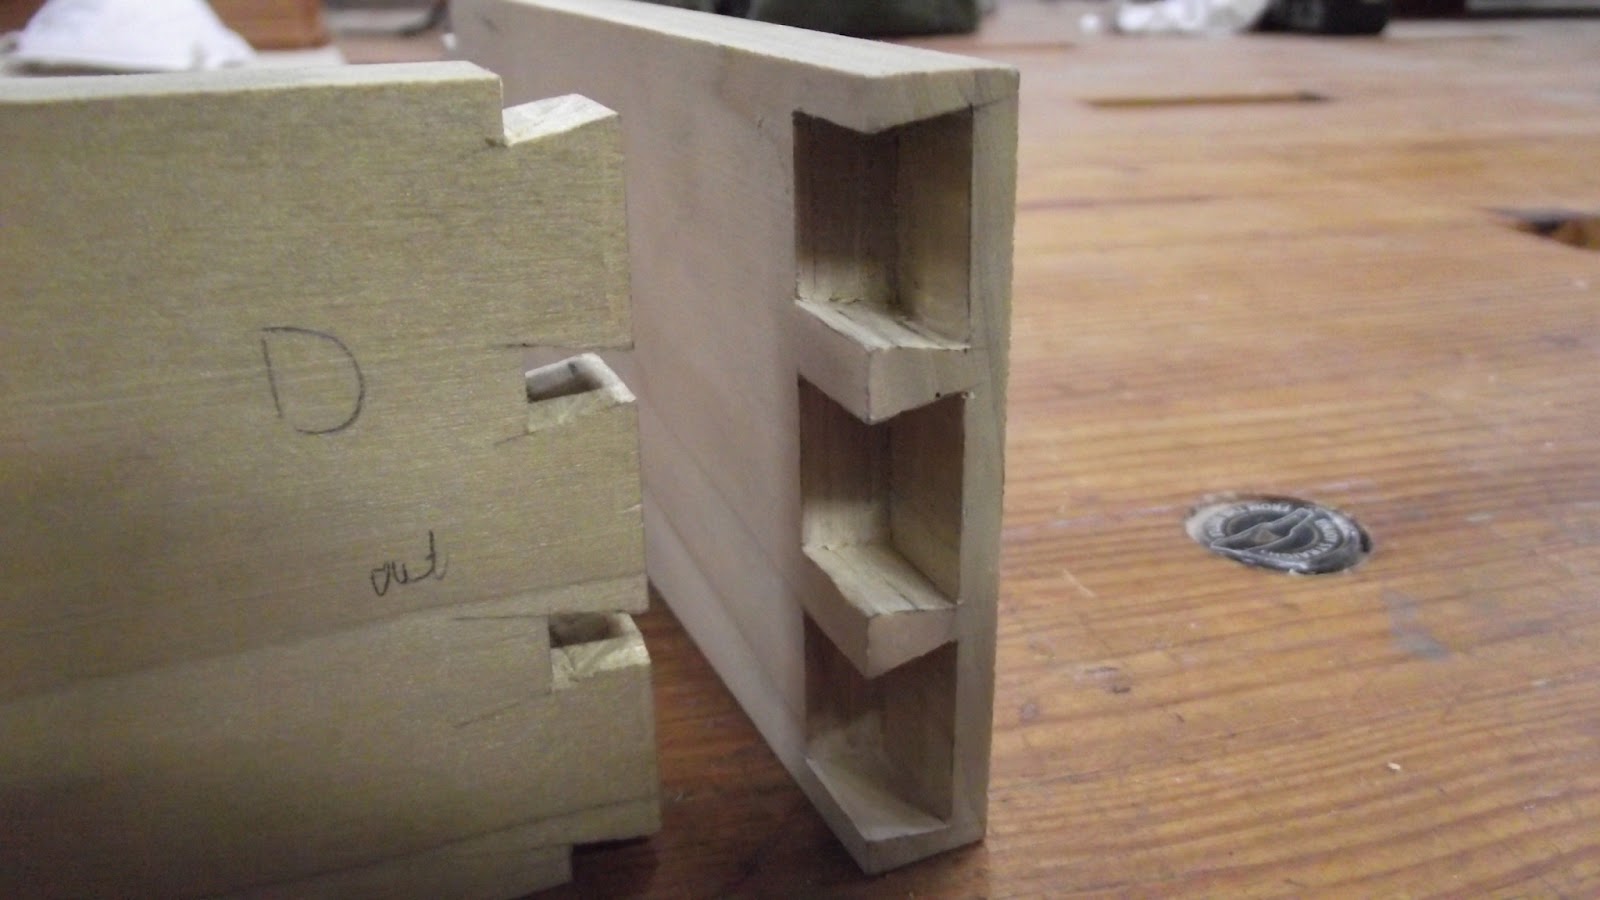
In this image you can see how I have cut the tenons into a box joint formation to interconnect inside the two converging mortises of the stool's leg.

For the diagonally opposing joints I chose to attempt a mitered tenon.
In the next couple of images you will see how the joints come together inside their respective vertical legs. You can also notice how the use of the hand plane was practiced to create the tapered inside dimensions of the leg as well as the rounded outside corner. This affords the vertical profile of the leg a more aesthetically pleasing finish.


Here is the completed frame to the stool. The seat top for the stool will be completed in the near future.

Moving onto dovetails, here you can see the first attempts at conventional through dovetails.


Followed by half blind dovetails.


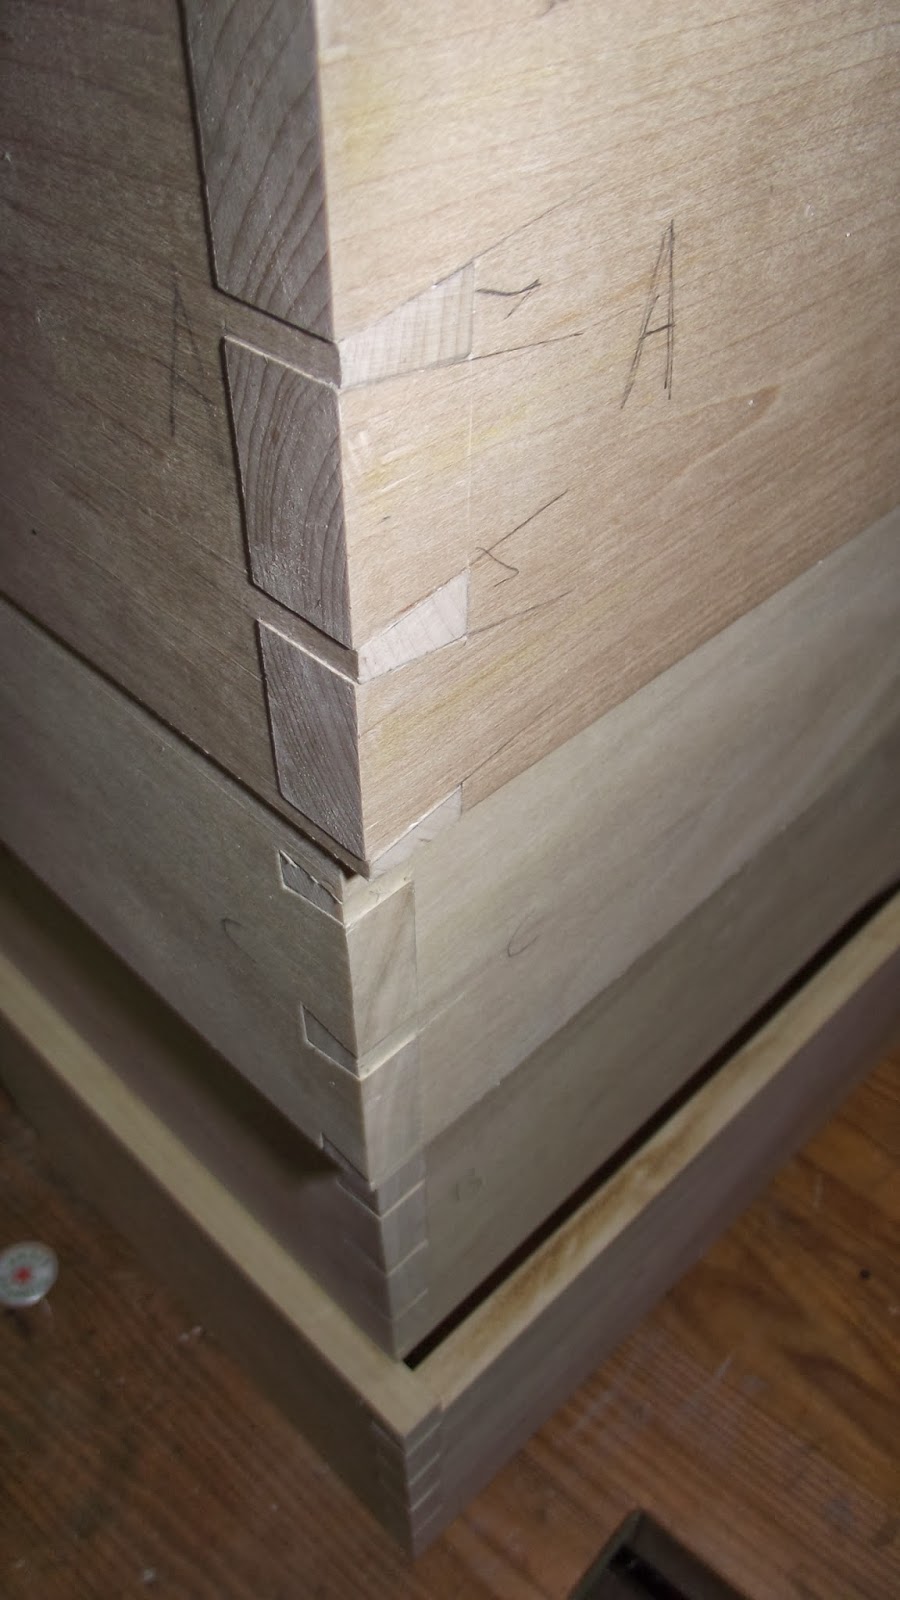


Followed by half blind dovetails.

28th July, 2013
It is with sad regret that due to
significant changes in my family life I will no longer be able to meet the 20
hours a week necessary to fulfil this program.
That said, it has proven to be of
great personal satisfaction to have had the skills of carving, planing and
joinery brought out over the course of the program. Heinz has been a very
meticulous teacher in drawing these skills out of me and has been very generous
with his time, patience and resources.
If there is one aspect above all others that Heinz has instilled in me, it is to take the time to do the best possible work and never be happy with less. It's a difficult way to go about your work all the time, but once you get that exacting nature instilled in you, the rewards are so much greater. I feel proud of the work I've achieved to date and it was a highlight to exhibit these skills at the 2013 Jazz Festival.
If there is one aspect above all others that Heinz has instilled in me, it is to take the time to do the best possible work and never be happy with less. It's a difficult way to go about your work all the time, but once you get that exacting nature instilled in you, the rewards are so much greater. I feel proud of the work I've achieved to date and it was a highlight to exhibit these skills at the 2013 Jazz Festival.
Buying our first home this summer, I hope to apply what I've learned in
furnishing and renovating the property. I know there is so much more to understand
and I know in Heinz and the others I've met through the shop, there are long
term friends and advice for me to draw on.
No comments:
Post a Comment