
Apprentice - Beth Fandal

www.fandalphotography.com
I am a New Orleans native and returned back to the Big Easy after studying at the College of Santa Fe, New Mexico. I received a BFA in Photography with a minor in Art History. I have been working as a photographer for the past 11 years. I taught art at A.P. Tureaud elementary school before Katrina as well work under a known local artist for seven years.
Over the years, I have always been intrigued and had a strong passion for woodworking. I have built one bed and a few tabletops, but I have no formal experience. The extent of my Knowledge has come from a few shops classes from college. I’ve been looking for someone hands on to teach me the proper skills of craftsmanship. I’m so grateful to have this amazing opportunity, to learn the skills and knowledge of construction and restoration of wood under a highly skill teacher.
This apprenticeship came into my life at the perfect time. I have been looking for this guidance for a while and finally the universe has given me this possibility. I hope to achieve a strong understanding of construction and design to collaborate my sense of art with functionally. .
FIRST PROJECT: April 2013
The first project in this apprenticeship is the hand carve a bowl out
of a cut off of mahogany wood. We are given the opportunity to be
creative in visualizing what we see in the raw piece of wood. We must
maximize the use of the whole piece a wood leave very little to be
taken away. We are given a very nice set of Swiss chisels and Japanese
bow saw.
of a cut off of mahogany wood. We are given the opportunity to be
creative in visualizing what we see in the raw piece of wood. We must
maximize the use of the whole piece a wood leave very little to be
taken away. We are given a very nice set of Swiss chisels and Japanese
bow saw.

The first thing I did was come up with a vision I saw in the whole
piece of wood. I drew several ideas on paper at first with out seeing
what piece of wood I had but all the ideas changed to fit the shape I
was given to work with. The wood dictates the direction of ideas. Here
is the shape I received the wood.


The next thing is to draw out the design and profile on the
actually piece of wood. The profile must be drawn on a separate piece
of wood since you will start carving the profile out the piece of
Mahogany. I choose to make an alligator bowl.


The first tool you use is the Japanese Bow Saw. This will make
rough cuts to cut away any extra material to achieve the basic shape
of the bowl. I also used a Japanese saw to cut out the
corners or hard to reach places with the blade saw. This is called
making release points. In the last two images. I used the straight saw
to cut down to the corner then use the more flexible saw to round
around to the corner. You must first straight cut to have a release
point for the other saw to cut off easier. Once I'm done with the two
Japanese saw I have a rough outline of the bowl.


On all chisels you will you a wooden mallet to hammer the end of the
chisel to remove large areas of wood. I learned that the wood has many
directions to the grain. It is very important to see and understand
which way the wood grain is going. If you are not following the right
direction of the grain then large chuck come out or splitting occurs.
One can go across the grain and most of the time will eliminate
chips coming out.


After you get a basic shape then you go back to start refining.
Starting on one area and getting to a finish point before moving to
another section will help keep you focused on where you are going with
the refine shape.


You always want to leave the bowl part for last since you need a place flat place to clamp down. So work out all the other details and save the bowl part or any other flat part to last.


After sanding you carve out the bowl section. You will need to use a fabric or something soft on the clamps to not make marks on your sanding detailed areas.


You will need to keep checking your depth of the bowl so you don't go through or make it too thin so you will want to leave at least 1/4 of an inch. Once you finish making all details and sanding you want to step back and ask what else can I do to make it more interesting. make sure you are happy with the end result before moving on to the final process.


The last choice you can make it to name your bowl.I went with Leroy the gator!
Practicing different Joints by Hand


After
practicing on several different types of wood from soft woods such as
cypress and hard woods such as oak, I'm ready to now make specific
joints. Some of the common joints are Lap joints, Right angled Lap joints. Joints can get really interesting when attempting angled joints while incorporating more complexity
such as open dove-tailed lap joints and tenon/lap joints.


.JPG)
.JPG)


Last Project : April 2014

 This was the base right after I polished with oil and but in the house. With most wood like cypress, cherry, spanish ceder, ect the wood will change over time in coloration. This is how it looks currently. Of course the lighting is a bit different.

 I'm very happy with the finish project and will always be grateful for what I have learned. I would highly recommend this apprenticeship to only serious craftsman who want to learn from a Master!!
Beth Fandal Deis
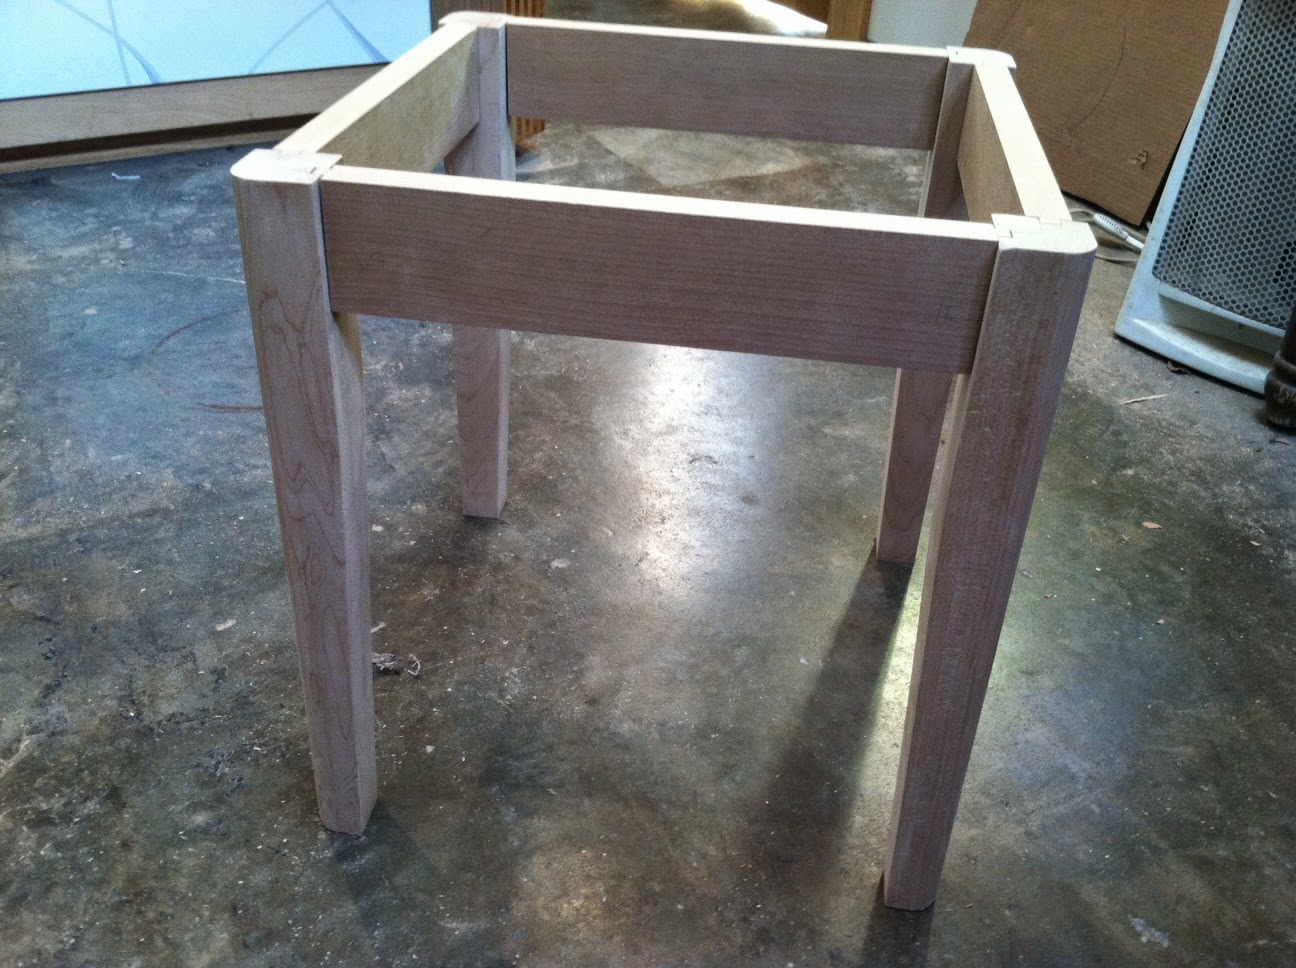
THE STOOL: Cutting Mortices and Tenons through joints.
Now
that I have practiced a few joints, we moved on to making a stool with
several different mortices and tenons. One of the important things to do
once you have prep your wood is to make sure you mark all pieces so you
don't lose what goes where. Work on one area at a time. Do not jump
around from corner to corner. Make sure it fits once done with all cuts.
Fine tuning will be required.
A
marking gauge, pencil, and using a metric ruler will be needed to get
accurate measurements. Cutting straight n the middle of the pencil line
will ensure a tight fit within the tenon and mortises. Keeping the
chisel flat to make sure you have a even plane. Using the square to
check your planes are straight and flat will be useful.
The
last step is to measure the leg from one point at the top to a
different point at the bottom of the leg to achieve a tamper leg. Then
use a hand planer to shave off to the angled pencil lines on each side
of the square leg. Finally sand the legs to a smooth finish.

The Dovetail Drawer
The
next learning project in the apprenticeship was mastering the dovetail
by hand. In order to master anything it takes lots of practice which
creates muscle memory. The more you
practice the better your hands become stable and accurate, which
dovetails take accuracy to match up the pins and tails. Making sure the
pins are smaller will make the joint stronger. Below is the common
through dovetail.
Another
type of dovetail is the blind dovetail which you can't see from the
front of the drawer. These tend to be a bit more challenging. You will
need to check all he pins and tails to make sure the planes are even and
straight with the square. What you may see with the naked eye can still be off to make gaps. Making all initial cuts perfect the less
gaps you will see.
There
are some jigs for dovetails but setting up a jigs take longer than
doing them by hand for a few drawers. Jigs are good for many an assembly
line of drawers . You will also need the dovetail ratios 1:6 or 1:8 to
set what measurements you want to use.
Also a measuring gauge will become handy to having the same measurements for each side.
The Chinese Puzzle
The next project was to read plans and to make 6 different pieces out of birch wood to all fit together.
After
making precise cuts you will need to sand everything smooth so it
glides together. Also all the corner will be broken and become softer
with sanding. Make sure you number or label each piece so you are not
confused which piece goes where.
Last Project : April 2014
Having almost completed a year of my internship and with the
encouragement of my ever meticulous teacher Heinz, I began to develop a design
of my own that would put the culmination of all my skills learned to date,
especially my dovetail creation abilities, to the test. The project was to be a drawer base with
three drawers in the side designed for holding vinyl records. Being involved in the entire process from the
design and proper layout, to creating a cut list, to the final finishing stain
was extremely educational and sharpened into focus the techniques I had learned
so far. It wasn’t a simple matter of
sketching out an idea and getting to work. My initial drawing was only the
first of several drafts each time altered to create a better design before the
final draft was ready to come off the paper and into the 3-dimensional
world. At this point draft is hardly
the word, this is a blueprint, and one that better be precise down to the
millimeter as it will be your guideline that you refer back to time and time
again as you build. I found it very
helpful to take breaks during this process, walk away and let the vision play
in my mind for a while before coming back refreshed to refine my ideas. Accuracy and attention to finite detail is so
very important even at this beginning stage. This is your foundation therefore
if the blue print is not accurate down to the millimeter your final product
will be off, and trust me at Heinz Gautschi’s shop nothing short of smooth
perfection is acceptable.
Building the actual drawer base was so much fun, as most of
my experience in the shop has been, though fun doesn’t mean losing sight of the
detail. Aspiring to the fine workmanship
level Heinz has always taught me, my focus was intense. Each cut of the wood is so important you
can’t be off by even 1/32nd of an inch without having to make
adjustments. This project was a true application of knowledge gained and so
exciting for me, opening up my mind to a myriad of ideas for future projects.
It gave me the confidence to begin to design and build more independently as
well as showing me my strengths alongside the areas I need to fine tune. Heinz’s generosity in sharing his time, his
art and his passion for woodworking has been an invaluable gift that I will
always be monumentally grateful for. His uncompromising pursuit of perfection
in his work and design has been deeply inspiring giving me a solid base on
which to grow in my own work. Towards
the end of this project my husband and I received the happy news that I was
expecting and after a great deal of thought we decided for the time being it
was best that I left the apprenticeship.
This was a very difficult decision as the past year has been one of the
most amazing of my life. I not only gained the wealth of knowledge and honing
my skills from a true master; additionally the community Heinz has developed
around the shop has enabled me to meet some of the most wonderful people in the
process. I will always hold this shop
and the people surrounding it near and dear to my heart. The work ethic, attention to detail, and insistence
on producing superior quality products that Heinz teaches and very much leads
by example will be carried with me into all the future work I take on, I have
already witnessed myself applying it in all aspects of my life changing my perspective. “Do it right the first time!” I would recommend this apprenticeship to anyone
that truly wants to learn from a master.
Beth Fandal Deis
No comments:
Post a Comment